Forester has been designed with simplicity in mind, you only need an Anaconda OS image which you can generate on the Red Hat Console or locally, and access to bare-metal hardware via out-of-band management with Redfish (e.g. iDRAC). Scroll down for installation and setup instructions.
Service installation
The Forester service is a single process with data stored in Postgres database and few directories. The recommended installation is via podman or docker.
podman volume create forester-pg
podman volume create forester-img
podman volume create forester-log
podman pod create --name forester -p 8000:8000 -p 8514:8514
podman run -d --name forester-pg --pod forester \
    -e POSTGRESQL_USER=forester -e POSTGRESQL_PASSWORD=forester -e POSTGRESQL_DATABASE=forester \
    -v forester-pg:/var/lib/pgsql/data:Z quay.io/fedora/postgresql-15; sleep 5s
podman run -d --name forester-api --pod forester \
    -e DATABASE_USER=forester -e DATABASE_PASSWORD=forester \
    -v forester-img:/images:Z -v forester-log:/logs:Z quay.io/forester/controller:latest
TFTP service, which is required for PXE, must be started separately with --network host option. Since the service port is lower than 1024, it m
ust be executed as root or unprivileged port boundary can be configured:
sudo sysctl net.ipv4.ip_unprivileged_port_start=69
podman run -d --name forester-proxy --network host quay.io/forester/controller:latest /forester-proxy --verbose
Visit documentation for more information about TFTP service connection tracking for NAT networks, permanent unprivileged port settings or uninstallation instructions.
Download and extract the CLI for Linux/Mac/Windows named forester-cli.
Infrastructure setup
Configure your DHCP server(s) in the following way:
- Intel x86_64 BIOS systems boot
bootstrap/ipxe/undionly.kpxefile over TFTP - Intel x86_64 EFI systems boot
bootstrap/ipxe/ipxe-snponly-x86_64.efifile over TFTP - Intel x86_64 HTTP EFI systems boot
http://forester:8000/bootstrap/ipxe/ipxe-snponly-x86_64.efifile over TFTP - Clients of iPXE software boot
http://forester:8000/bootstrap/ipxe/chain.ipxefile over HTTP
HTTPS is not supported yet.
Example configuration for dnsmasq (replace 1.2.3.4 with IP address of the service):
dhcp-vendorclass=set:bios,PXEClient:Arch:00000
dhcp-vendorclass=set:efi,PXEClient:Arch:00007
dhcp-vendorclass=set:efix64,PXEClient:Arch:00009
dhcp-vendorclass=set:efihttp,HTTPClient:Arch:00016
dhcp-option-force=tag:efihttp,60,HTTPClient
dhcp-match=set:ipxe-http,175,19
dhcp-match=set:ipxe-https,175,20
dhcp-match=set:ipxe-menu,175,39
dhcp-match=set:ipxe-pxe,175,33
dhcp-match=set:ipxe-bzimage,175,24
dhcp-match=set:ipxe-iscsi,175,17
dhcp-match=set:ipxe-efi,175,36
tag-if=set:ipxe-ok,tag:ipxe-http,tag:ipxe-menu,tag:ipxe-iscsi,tag:ipxe-pxe,tag:ipxe-bzimage
tag-if=set:ipxe-ok,tag:ipxe-http,tag:ipxe-menu,tag:ipxe-iscsi,tag:ipxe-efi
dhcp-boot=tag:bios,bootstrap/ipxe/undionly.kpxe,,1.2.3.4
dhcp-boot=tag:!ipxe-ok,tag:efi,bootstrap/ipxe/ipxe-snponly-x86_64.efi,,1.2.3.4
dhcp-boot=tag:!ipxe-ok,tag:efi64,bootstrap/ipxe/ipxe-snponly-x86_64.efi,,1.2.3.4
dhcp-boot=tag:!ipxe-ok,tag:efihttp,http://1.2.3.4:8000/bootstrap/ipxe/ipxe-snponly-x86_64.efi
dhcp-boot=tag:ipxe-ok,tag:!efihttp,bootstrap/ipxe/chain.ipxe,,1.2.3.4
dhcp-boot=tag:ipxe-ok,tag:efihttp,http://1.2.3.4:8000/bootstrap/ipxe/chain.ipxe
Example configuration for ISC DHCP:
if substring(option vendor-class-identifier, 0, 10) = "HTTPClient" {
    option vendor-class-identifier "HTTPClient";
}
set vendor-string = option vendor-class-identifier;
next-server 1.2.3.4;
option architecture code 93 = unsigned integer 16;
if exists user-class and option user-class = "iPXE" {
    filename "http://1.2.3.4:8000/bootstrap/ipxe/chain.ipxe";
} elsif substring(option vendor-class-identifier, 0, 10) = "HTTPClient" {
    filename "http://1.2.3.4:8000/bootstrap/ipxe/ipxe-snponly-x86_64.efi";
} elsif option architecture = 00:07 {
    filename "bootstrap/ipxe/ipxe-snponly-x86_64.efi";
} elsif option architecture = 00:09 {
    filename "bootstrap/ipxe/ipxe-snponly-x86_64.efi";
} else {
    filename "bootstrap/ipxe/undionly.kpxe";
}
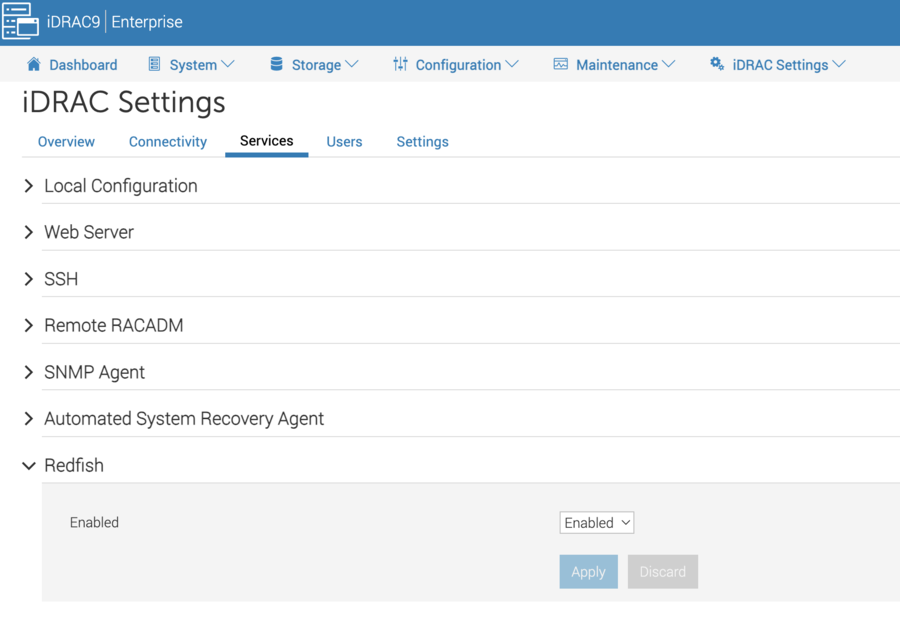
Enable Redfish protocol on managed server hardware, an example for Dell iDRAC:

Turn off SecureBoot, this is not supported yet.
Optinally, create a Redfish user account with the following permissions:
- Read/list information about system(s).
- Power operations (soft and hard power cycles).
If you don’t have available hardware for POC, it is possible to configure libvirt instead. It has some limitations tho and it is only recommended for development purposes.
Discover your servers
Register Redfish appliance by providing an URI to Redfish API of all systems which are supposed to be managed by Forester:
forester-cli appliance create --kind redfish --name dellr350-a14 --uri https://root:calvin@dr350-a14.local
Enlist all systems available via the appliance
forester-cli appliance enlist dellr350-a14
Every recognized system has one or more MAC addresses and an auto-generated name.
forester-cli system list
ID  Name        Hw Addresses           Acquired  Facts
1   Lynn Viers  6c:fe:54:70:60:10 (4)  false     Dell Inc. PowerEdge R350
Build image(s)
Images of Red Hat Enterprise Linux can be generated at Image Builder. It is possible to install osbuild and perform image build locally. Alternatively, there is also a web user interface named cockpit-composer for Cockpit.
Install and enable composer, this must be done on a Fedora or Red Hat (or compatible) system on the same OS version and architecture as the final image. It is possible to configure cluster of workers of different architectures but this is out of scope of this tutorial:
sudo dnf install osbuild-composer composer-cli
sudo systemctl enable --now osbuild-composer.socket
sudo usermod -a -G weldr <user>
newgrp weldr
Create a blueprint which is an image “recipe” as base-with-vim.toml:
name = "base-image-with-vim"
description = "A base system with vim"
version = "0.0.1"
[[packages]]
name = "vim"
version = "*"
And build an initial version of the image:
composer-cli compose start base-image-with-vim image-installer
To monitor the progress use compose-cli compose status command, once the built is done use composer-cli compose results command to download a tarball containing log files and an ISO image:
tar -tf 1fd0552f-26ab-4e8f-abdd-1abdf8383b1d.tar
1fd0552f-26ab-4e8f-abdd-1abdf8383b1d.json
logs/osbuild.log
1fd0552f-26ab-4e8f-abdd-1abdf8383b1d-installer.iso
The image will be the same OS version as the system the command was executed on. It is possible to build older version of the OS the osbuild-composer is installed on, refer to the project documentation, man pages and CLI help screens for more info. On Fedora, it is also possible to build Fedora Next (Rawhide) version too, e.g. on Fedora 39:
composer-cli distros list
fedora-37
fedora-38
fedora-39
fedora-40
Upload the image to Forester:
forester-cli image upload --name RHEL9-2023-11a 1fd0552f-26ab-4e8f-abdd-1abdf8383b1d-installer.iso
Keep in mind that the official Fedora or Red Hat Enterprise Linux installer ISO images will not work, you have to upload a custom-built ISO image which contains Anaconda installer and the OS filesystem image in a compressed tarball. In other words, do not upload the official RPM installers like Fedora-Server-dvd-x86_64-39-1.5.iso, this is a different artifact.
Deploy images
To install an image onto a system, perform deploy operation and provide both image name and system name or one of its MAC addresses:
forester-cli system deploy Lynn --imagename RHEL9-2023-11a
Forester will power cycle the server, Anaconda will boot up, receive kickstart instructions, download the tarball, perform drive partitioning and then copy the OS image to the system instead of traditional RPM installation.
Installation can still be customized using kickstart snippets, this is particularly helpful for drive partitioning, users and passwords or running custom shell scripts at the end of the installation.
Let us know what you think and read more in the documentation.